Posts

Showing posts from May, 2020

Small Craft Organization Idea - Reusing Rolling Cart Drawers

Image
     Super simple idea, but wanted to post something in case it could help someone else. . .      My boys had stopped using the rolling carts with drawers that most stores seem to have.  (I think we got our from Costco years ago.)   They had bent the metal frame - so I couldn't use them as they were.      I had to toss the frame, but I've used the drawers for two main reasons. . .      1.) Storage -  I use them for a few things, one being for my rulers.  It's pretty handy because I can quickly grab one or bring the whole thing to my table when I need to.      2.) Group things for projects - They keep most supplies I need to finish a project in one area.  The drawers make it easy to move things around.  I can go from working on something to putting it away without worrying that I'm forgetting or losing something.  I tend to start and put things on "pause" quite a bit - mostly I'm waiting for something (could be supplies, time to work on it, or motiva

DIY Glue Dots & Storage

Image
     This idea isn't original - I've seen it around but thought it couldn't hurt to share my process and storage idea.      I made two sizes of glue dots using the Aleene's Tack it Over & Over method.      I labeled this post "Repurposing" because I used old feeder printer label sheets and a small Stampin' Up! container.      Sometimes it's good to go back and review some basics.  T hanks for checking out my quick project for today - hope you're doing well and hope that maybe I sparked a bit of creativity or motivation in you! (On with the yammer. . .)      I wanted to have the glue dots be as close to the same size as I could, so I made templates.  I used a Sharpie to trace the small feeder holes from the label sheets I saved to make a pattern for the smaller sized dots.  (I got a box of the old feeder-type printer labels a looong time ago and still use them - I keep the sticker paper for other projects like DIY stickers & embel

My Craft Corner's History

Image
     Normally, a shorter version of a post would be first, but not this one.  This one isn't about a project, it's about the history of my craft space.  Maybe I can entertain someone out there, maybe I can help someone by providing a nudge, motivation, inspiration, or just a reminder that we don't all have to have areas that look like the professional ones.      I can't say how much I've spent on my Craft Corner because I've "shopped my house" as much as possible, patched things together, and I didn't do it all at one time.  I've tried to purchase as little as I can.  I'm currently trying to make it my own and make it a place that inspires me to create fun things.      When we moved into our current house, I thought I was going to have a small area that was probably used as the converted garage/man cave's fishing tackle closet.  (It's a closet with a built in desk and a few wall shelves.)   After I had moved some things in and w

Craft Corner - Recycle Box

Image
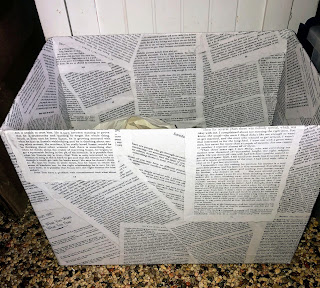
     I was using a paper grocery bag to put my recycled paper -  scraps too small to do anything with, notes I didn't need anymore, small cardboard scraps I couldn't use, etc.  It was working ok for awhile, but why not improve it?      I took an old box and decoupaged for the first time.   (I like the idea of having a recycled container for the recycle bin.  It's the 3 R's all in one - reusing a box and reducing the need for a new container for the purpose of recycling.)      Who says you need to buy things to feel good about your space? - hope you're doing well and hope that maybe I sparked a bit of creativity or courage in you!      On with the yammer. . .      When my mojo dropped, I thought I should make my craft space better somehow.  When I had to use the space, I felt more drained than anything.  It wasn't inspiring me or helping me get things done.      Sometimes I need to do something, no matter how small, to get the creative juice flowing

Quarantine Project #3 - Unfinished Side of a Locker

Image
     So far, my posts have been about the corner in my craft corner.  I have one item left to do, but I have to wait to get supplies, so I don't know when it'll get done.  In the meantime, there is an area that could use an upgrade.      I wanted to tackle an unfinished side on one of my wooden lockers.  After thinking about it, I made a plan on paper.  I traced my plan on the side using a pencil to quickly check things out.  Then I took a miter saw to some scraps.      Did a dry run to check if any adjustments were needed - and see if I was sure I'd like it.  Once I was sure of myself, I got our brad gun out and nailed in the top, bottom, and side pieces.      I couldn't find any scraps/pieces for the middle, so tried just painting the area with the acrylic paint I have.  Nailed up a lamp to see if paint job would work. . .      That's the project in a nut shell. . . . thanks for checking this project out.      One quick detail about a problem th

Quarantine Project #2B - IKEA Gnedby

Image
     As I posted before, I had some extra beadboard. . . and used it to make more pieces in my craft corner seem more like a matched set.      I didn't have a piece big enough to fit the whole back and didn't want to disassemble the IKEA Gnedby unit, so I just measured all the spaces and ended up doing a lot of cutting with the miter saw.  I measured things as well as I could so the grooves in the beadboard would be in the same place on all of the shelves.   (I planned a little ahead so I ended up cutting all the pieces I've used in a few projects all at once.)      For now, I've just placed the pieces in and put my supplies on the shelf.      Thanks for checking out my quick project  - hope you're doing well and hope that maybe I sparked a bit of creativity or courage in you! (on with the yammer. . .)      Sorry I didn't take a "before" pic, but it's not that different.   (If you really want to see what it looked like before, IKEA st

Quarantine Project #2A - File Cube

Image
     I had some extra beadboard from when an IKEA closet needed a stronger back. . . and a desire to use it to make pieces in my craft corner match.  I tried to plan things so I could do all my cutting for projects I've lined up all at the same time.      This project was pretty simple, but I like the results.  It was just 4-5 simple steps. 1.)  Cut beadboard to size. 2.)  Unscrewed the metal pull. 3.)  Glue beadboard in  (this time I just used good ol' Elmer's White Glue). 4.)  Re-screwed the pull back on. *5.)  I didn't cut everything "right" so the edges weren't perfect.  I used a little DryDex Spackling  (using my finger) to compensate .      I like how I didn't get the screws on the pull onto one of the grooves.    It's housing my Christmas cards, etc. so won't be used all that often. - hope you're doing well and hope that maybe I sparked a bit of creativity or courage in you!          Brief over, on with the yammer.

Quick Project Share - Paper Cube

Image
     I wanted to fix my paper cube.  The dividers kept shifting out of the grooves.      So, after hubs cut some wood for a project, I swiped some scrap wood and cut down to the width of the sections needed in the cube.  I painted them white with craft paint and then glued them in.      They're not the same size because the scraps weren't the same.  I just measured the width needed and moved ahead - but they're doing their job and they're keeping the dividers still.      I thought I'd share the close-up pics in case they could inspire someone.  I never really know where or when inspiration will hit me, so don't know what can or will inspire someone else. Even if these cubes aren't a solution, they could be something that sparks an idea for someone else - - hope you're doing well in these strange times!      Small project, on with the small yammer. . .     Sorry I didn't take a pic of the "before," but wasn't thinking of