Craft Organization - Charm Storage
After making the drawer-shelf unit I posted here, I decided to use it for all my jewelry craft items (charms, tools, chains, etc.). They were tightening the stay-at-home regulations again, so shopping didn't seem prudent. I went through what I had and tried to organize my supplies better, with the idea that I'd use them more if they were easier to find. . .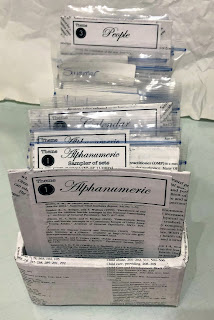

I cut down the granola box - magazine file thing I mentioned in my last post. I glued extra cardboard to double the box's thickness all around since it was going to hold a bit and could get heavy.
I grabbed our box of square sized snack baggies, (without any guilt since we weren't using them for school anymore) and cut down some more cardboard to make dividers. The cardboard was ugly and from various boxes, so I wrapped them in decoupage along with the box, and printed up labels for each divider and baggie.
Hope you're doing well and hope I was able to encourage or motivate you.
(On with the yammer. . .)
I've had my charms in a few different things over the years. As they grew, I had to change. (I've gotten quite a few of cheap ones off ebay.) Before this idea, I had them inside a few plastic boxes and at least one cookie tin. I had a couple of DMC floss organizers and a few small plastic containers, but things weren't easy for me to use. Charms were crammed into little compartments, sometimes sharing space with something I wouldn't necessarily use together. Some were put somewhere different because they wouldn't fit - making projects take longer and finding a charm I kinda liked a challenge that I usually didn't have the time for. (Notice I didn't say loved? I didn't count how many projects got a charm only for me to find a better one, or even the one I originally wanted.. .it could depress me too much.)
Now that I had a few drawers to play with and the time to work on it, I went through my supplies with a very open mind. I decided to alter the box/files I made from Costco granola boxes. I had to make all sides the same height, which wasn't as easy as it would've been if I had just done so in the first place, but it wasn't too difficult.
While I am liking the idea of making things similar in my craft corner to make things look more planned/cohesive/organized than they really are, I decoupaged these to cover up the places where I tore off the other layer and give them more stability. It also gave me a chance to right a "wrong" (and boy, I know, that decoupage job was all sorts of shades of wrong).
When I printed labels for the dividers, I decided to print an "extra" label for the snack bags and put the charms into them. (One baggie has 1 "sample" of any sets I have, another baggie has any single charms.) I figured this would be a nice way that would allow me to play with them easier. I'd grab these two baggies when I have a project that I want to put charms on/in and be able to quickly see what works best or which charms work together well. Sets get their own baggies and are stored behind the other two baggies - that way I could either replace what I used or get what I needed.
I didn't make a label for each set - I may have more time than usual, but would rather do a list of other things than individually label each and figure it would be a lot easier to reuse the baggies if they weren't labeled.
If you're a "pinner," you can check me out at https://www.pinterest.com/daylightdesigns/


Comments
Post a Comment