Repurposing into Organization
Quick idea: before you toss/recycle something, look at it. Try to see if it can be used as is or if you can modify it somehow for your needs. (What/how you modify depends on your knowledge & skills.)
Try to see if you can use it alone or with something else. Shape and size are a little important, but play around with it. Sometimes it can be cut down, sometimes it just needs to be rotated, and sometimes it can be part of something else. If it's flimsy, you can double up walls and/or decoupage it for added strength. (I cut a cereal box in half to make it thinner and sturdier.) Maybe it can be attached to another box or put inside something else to help organize things (I found a hot chocolate mix box is almost the same width as a photo box from Michael's and I use a few of them to help sort my photos better).
Just a quick idea this time - we've been busy with our kids and home as well as trying to get some things done in our attic before the summer heat really hits us.
(On with the yammer. . .)
Shortly after moving into our current house, I got into the habit of putting things that weren't being used into a room that that we didn't use as much - including containers. Whenever there was a mess (or area that needed organizing), I'd know where to go. I like having one area I can go to and find something useful. Luckily, I still have some room to do this for now.
I've tried to put similar items together and now that the family is starting to use the space, I've tried to keep them out of the way. Not only is it easier to find, but to me, things seem neater when they're stored in similar items whether they're jars, baskets/bins, or boxes. (I know I can't be the only one - it has to be one of the reasons why I've seen a quite a few different versions of tin caddies online.) I noticed I also seem to use and store things easier when I have a few of the items on hand.
Some of the things I've kept are: cardboard boxes from Amazon/Costco/frozen pizzas/saltine crackers/canned tomato sauce/etc., baskets, tins, glass jars, and plastic containers of different sizes. (Costco egg containers are clear plastic and are nice for Christmas ornaments, beads, etc.) I've started decoupaging a few of the cardboard boxes I'm using for supplies, so I've started to keep pages from some of the books I've been reading. (With kids, I don't generally sit down and read a whole book like I used to, so tearing out the pages after I've read them is making it easier to just pick it back up and resume reading. . .yes, I could use a bookmark, but I'm only using/tearing the cheap mysteries I've gotten for under a dollar.)
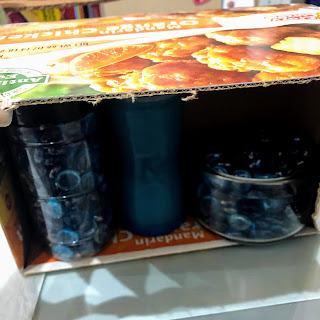
I thought an Orange Chicken box from Costco had a nice feel/thickness - but it was tall and thin, so I cut and glued it to make it short and wide instead. I glued the original flaps closed, cut into the front panel to open up the new top, and glued down the cut flaps to make the edges smoother (it prevents me from being forced to cut it, which I have a hard time doing, even with an army of rulers - so it helps keep the edges all the same height and the edges straight - win, win!). I used some containers filled with the flat glass pieces I've had for awhile (probably from Dollar Tree). They help the box keep its shape while the glue is drying. I've also used the clips from pant hangers to keep the flaps down, but I've noticed lately they have been leaving marks. This way is a little more time consuming, but it only takes a few minutes to prep each side (which is easier with the kids at home) and I wasn't in a rush to do all four sides at once anyway.
I decoupaged some of the leftover moving paper on it to cover up the pictures on the box. It's now a good size for a few paperback novels I have laying around.
I "found" this Amazon box in my dwindling closet of boxes. It was a nice size and was sturdy, so I tried to see if it would fit in my lockers and if I could use it in any of them. I discovered it fit in one of the areas I was working on if I put it on it's side. I ended up cutting it in half so I could get two boxes - because it has flaps on the top and bottom, I only had to make two cuts. It was easy and gave me two nice, sturdy boxes. Next time hubs gets another Amazon delivery, I'll probably look at the box a little longer than I should!

Once I had the boxes, I used the book pages I've saved to decoupage them. I went through my cards and organized them while my homemade mod podge was drying (3 parts Elmer's glue to 1 part water). I've taken thicker cardboard to make dividers to separate them into the bigger themes and different styles (Anniversary/Birthday/Get Well, and Decorative/Floral/Stripe etc.) and used the thinner cardboard (mostly food boxes) to seperate them a little further. I cut them to the width of the Amazon box but cut them a little taller than the edge of the box to make sure they could be seen over most of the cards. I haven't put on the labels yet because I'm not 100% sure I'm going to use it that way - I'm thinking about adding a shelf to the locker pictured above. I'm trying to figure out the details to make a pull-out drawer underneath and might use it for finished cards and tags. The two boxes I "made" from the Amazon box will fit nicely on it next to each other. I just have to think about what would make the most sense to me.
If you'd like to take a look at other craft corner organization ideas that I've liked, use, or plan to use, my Pinterest board for it is at: https://www.pinterest.com/daylightdesigns/craft-corner/
Try to see if you can use it alone or with something else. Shape and size are a little important, but play around with it. Sometimes it can be cut down, sometimes it just needs to be rotated, and sometimes it can be part of something else. If it's flimsy, you can double up walls and/or decoupage it for added strength. (I cut a cereal box in half to make it thinner and sturdier.) Maybe it can be attached to another box or put inside something else to help organize things (I found a hot chocolate mix box is almost the same width as a photo box from Michael's and I use a few of them to help sort my photos better).
Just a quick idea this time - we've been busy with our kids and home as well as trying to get some things done in our attic before the summer heat really hits us.
(On with the yammer. . .)
Shortly after moving into our current house, I got into the habit of putting things that weren't being used into a room that that we didn't use as much - including containers. Whenever there was a mess (or area that needed organizing), I'd know where to go. I like having one area I can go to and find something useful. Luckily, I still have some room to do this for now.
I've tried to put similar items together and now that the family is starting to use the space, I've tried to keep them out of the way. Not only is it easier to find, but to me, things seem neater when they're stored in similar items whether they're jars, baskets/bins, or boxes. (I know I can't be the only one - it has to be one of the reasons why I've seen a quite a few different versions of tin caddies online.) I noticed I also seem to use and store things easier when I have a few of the items on hand.
Some of the things I've kept are: cardboard boxes from Amazon/Costco/frozen pizzas/saltine crackers/canned tomato sauce/etc., baskets, tins, glass jars, and plastic containers of different sizes. (Costco egg containers are clear plastic and are nice for Christmas ornaments, beads, etc.) I've started decoupaging a few of the cardboard boxes I'm using for supplies, so I've started to keep pages from some of the books I've been reading. (With kids, I don't generally sit down and read a whole book like I used to, so tearing out the pages after I've read them is making it easier to just pick it back up and resume reading. . .yes, I could use a bookmark, but I'm only using/tearing the cheap mysteries I've gotten for under a dollar.)
I thought an Orange Chicken box from Costco had a nice feel/thickness - but it was tall and thin, so I cut and glued it to make it short and wide instead. I glued the original flaps closed, cut into the front panel to open up the new top, and glued down the cut flaps to make the edges smoother (it prevents me from being forced to cut it, which I have a hard time doing, even with an army of rulers - so it helps keep the edges all the same height and the edges straight - win, win!). I used some containers filled with the flat glass pieces I've had for awhile (probably from Dollar Tree). They help the box keep its shape while the glue is drying. I've also used the clips from pant hangers to keep the flaps down, but I've noticed lately they have been leaving marks. This way is a little more time consuming, but it only takes a few minutes to prep each side (which is easier with the kids at home) and I wasn't in a rush to do all four sides at once anyway.

I decoupaged some of the leftover moving paper on it to cover up the pictures on the box. It's now a good size for a few paperback novels I have laying around.
I "found" this Amazon box in my dwindling closet of boxes. It was a nice size and was sturdy, so I tried to see if it would fit in my lockers and if I could use it in any of them. I discovered it fit in one of the areas I was working on if I put it on it's side. I ended up cutting it in half so I could get two boxes - because it has flaps on the top and bottom, I only had to make two cuts. It was easy and gave me two nice, sturdy boxes. Next time hubs gets another Amazon delivery, I'll probably look at the box a little longer than I should!

Once I had the boxes, I used the book pages I've saved to decoupage them. I went through my cards and organized them while my homemade mod podge was drying (3 parts Elmer's glue to 1 part water). I've taken thicker cardboard to make dividers to separate them into the bigger themes and different styles (Anniversary/Birthday/Get Well, and Decorative/Floral/Stripe etc.) and used the thinner cardboard (mostly food boxes) to seperate them a little further. I cut them to the width of the Amazon box but cut them a little taller than the edge of the box to make sure they could be seen over most of the cards. I haven't put on the labels yet because I'm not 100% sure I'm going to use it that way - I'm thinking about adding a shelf to the locker pictured above. I'm trying to figure out the details to make a pull-out drawer underneath and might use it for finished cards and tags. The two boxes I "made" from the Amazon box will fit nicely on it next to each other. I just have to think about what would make the most sense to me.
If you'd like to take a look at other craft corner organization ideas that I've liked, use, or plan to use, my Pinterest board for it is at: https://www.pinterest.com/daylightdesigns/craft-corner/


Comments
Post a Comment