Quarantine Project #1 - Craft Corner Shelves
The corner of my "Craft Corner" wasn't working well for me, so I wanted to fix it. First, I cleared everything out.
 I found some wood scraps from previous projects (not ones in the pic). One piece was big enough to fit over the empty space and three wood lockers I have. Had hubs bring out his miter saw and I cut the piece to make one long top for the whole area.

I had other scraps/unused pieces to make two shelves underneath the top. The walls have wiring - electrical and other cable, so I skipped drilling into the wall and cut supports for the corners.

The back corner is 2 pieces glued together - didn't have enough for all solid pieces, so I added more scraps between the corner supports for added security. Haven't attached anything yet - just using gravity and keeping my eye on it for now. So far, it's working well enough I might leave it as is.
- hope you're doing well and hope that maybe I sparked a bit of creativity or courage in you!
If you're someone who likes to read, on with the yammer. . . .
Ok, first; honesty - this isn't a 100% free project. Hubs had to make a trip to Home Depot to pick up supplies for a hose rack he's making for the fire department he volunteers for and picked up the faceplate for the cable (it's on the right side of the middle shelf in the pic) to cover up the hole that's been there since we moved.
I'm blogging about this because I'd like to help anyone out there who thinks that craft spaces have to be perfect. Someone who may think that craft rooms can/should be completed with one quick shopping trip. Someone who doesn't realize that craft spaces can take a lot of time (and honestly, can/will/should change in time when your interests change). Someone who needs "permission" to not judge themselves too harshly when comparing themselves and their craft space to another. (Someone like I was. . .ok, like I am - but I am trying not to be. It's a process!) No "true" crafter worthy of her glue gun or score board would judge another, so I need to stop doing it to myself (hopefully are you aren't either).
I believe crafting is making do with what you have and I kinda like the challenge that brings. I am in the process of trying make sense of my space and make things more efficient. I'm trying to make things look better if/when I can - I'm also hoping it'll get me moving and help spark both creativity and confidence in myself. I'm blogging because it might do the same for someone else.
During this time of quarantine, I thought I'd tackle the one area in my craft corner that's been a bit of an issue since I was given permission to use the area. Ironically, it's the actual corner. I've moved more things in and out of it for around 2 years now that I've lost count - and yet all I really saw was the space I wasn't able to use. Hubs is handy, so he told me to design something and said he'd build it. . . I did, but he's gotten a "few" other projects put onto his list (I've still got that "Queen of Understatement" crown) and the craft corner has moved down the line far enough that a completion date is - um, idk, the 53rd of never. (Yes, I know the saying is the 12th of never, but we have a house. kids, and he's working on projects for other people, so there'd have to have more days of the month to come near it) - Anyway, far enough to move on, give up, and finally realize waiting isn't a bright idea. I've decided to try to fix it myself. I have to be able to do something myself that'll work "in the meantime" and might even work for a permanent basis.
After trying a few things either actually in the space or just in my head, I was thinking I could use some of hubs' tools to modify the locker I already had there. I'd cut the top off so I could put wheels on it and cut one side down a bit so it'd fit. There's space beside the white bookcase I have, so I could have shelves that are hidden when the piece is in place. I'd then add a front side, add a handle, and put the wheels on the bottom to have a pull out. Finally had hubs in a decent enough mood to talk to him about it and bounce off a few ideas to see if I could do it and was told it wouldn't work. His tools can't cut off a side of the locker.
On to Plan 75 or whatever it is (I haven't counted them for fear of pissing on my own parade and giving up). So, move on ahead and build the shelves in the recessed area myself and tackle the pull out later. First step, "shop at home" / see what I have to help motivate me into action. It helped that I felt like I'd have nothing to lose and not doing anything would be a bigger mistake than not doing anything.
I found some "extra" wood and measured them to see if they can be shelves. Not perfect, but I can make do - and bonus! They're already white. I also have shelf supports in the form of wooden slats from an IKEA bed I noticed by a parking lot dumpster as we went out for lunch a month or two before TP became more valuable than gold. (The headboard grabbed my eye and I could see a sign project in my future. We had driven our pick-up and the boys had plenty of extra energy when we were leaving, so it seemed perfect to have them grab all of the wood. I figured I could use the rest of the wood for shelf supports for a closet project I was already planning.) Double check with hubs to be sure I'm not stealing from any other projects and full speed ahead.
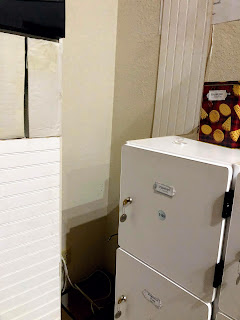
When all the boys are distracted (including the hubs), clear off things from locker to remove it from the corner and clear the area. Huff & puff as it's slowly lifted from it's awkward spot using my legs to help balance it so I can get a better grip on it and so it doesn't gouge the wall or knock over things in the bookcase as I put it onto the top of the other lockers and then out of the room. Not a brilliant idea, but still did it because - a.) I want it done now while I still am motivated to get things done, b.) I don't want to ask hubs for help because he's pretty busy and will give me grief if/when he actually will come and help, and c.) I'm too lazy and don't want the hassle to take all the stuff out of the bookcase, find places to put it all (don't see enough in my area so it'll be spread out, possibly inconvenience someone else enough for a fit/fight - or it's all put too far and I end up "losing" things), only to move the bookcase to get to the locker and then move everything back to where it just was. ("Ain't nobody got time for that," even in a quarantine.)
Enjoy looking at empty corner because I did it - without any help. Try to enjoy the progress made, try to nurture the tiny confidence gained to help keep things moving forward, and plan the next steps carefully.
Get the stud finder and discover that there's only one support in the planned area. . . plus, wiring along the wall and the idea of drilling into it makes me very nervous. So, modify plan whatever-number to whatever-number-B. Make shelves, but have them sit on supports and eliminate need to drill into wall! Again, check supplies and see what can be used, but try to be more creative this time. Shelf pieces need to match up to the bookcase for the pull out idea and are just a little too long for the depth. Plan on using power tools to trim them down. Other parts from the IKEA dumpster bed placed in the corners should be able to hold up whatever boxes or binders put there when placed (and to think, I almost tossed them). Calculate and realize some pieces need to be glued together because things aren't perfect and there isn't enough to only have one piece supports for every corner. Remeasure things since plans changed. Measure twice, cut once is a good philosophy (especially for people like me who have hard times drawing straight lines, even with a ruler) plus, stuff isn't set up now. Also, this'll take up a few more minutes so, what else are ya gonna do during a quarantine - especially when everyone else is in bed?
Get hubs to get miter saw out so you can trim down the long top, shelves and cut shelf supports. Paint supports white to match all other pieces in area. Put the four bottom supports down and put the bottom shelf on top. Hold breath and see if it stays up. Yes! Breathe again and quickly revel in the joyous feelings of success because we need to celebrate the little things in life, (especially these days!) and keep moving on. Cut two small shelves found at mom's house because - why not have extra insurance? You're not anchoring them to the wall, a few supports are more than one piece, we can all use a little extra support, and you can't think of anything else they'd be used for anyway. Paint em'? Nah, keep the pale lavender (from '86?) to add a little bit of nostalgia when you grab for something off the shelf that will eventually be behind a pull out.
Move on to the top piece and cut with miter saw. Cut as much as you can, then flip piece over and put blade into original cut to line it up and then start blade and cut again because saw isn't designed to cut that long a piece. . . (thank son for holding other side of the piece because you're cutting it to be 73" long and your set up doesn't support the other side of the plank.) Place piece on top of the three lockers and the previously empty space to make a great place for your ScrapRack. (Hope that being nestled in the corner and behind the bookcase will help shield/protect it a bit from sunlight.) Add the IKEA support pieces on the four corners underneath and add the extra pieces.
Stand back and revel in something you did. Try not to visualize what sons would call a meme, but you've always called a "clip" from a TV show.
Do not do it. But I can't help it - NO - it makes a good ending - Not that stereotypical 80's schtick - great one liner before the still shot and end credits roll - It's soooo cheesy - but you know you really wanna say it out loud when the corner is finally finished - - urgh - "I love it when a plan comes together. . . ."
If you're a "pinner," please check me out at https://www.pinterest.com/daylightdesigns/


I had other scraps/unused pieces to make two shelves underneath the top. The walls have wiring - electrical and other cable, so I skipped drilling into the wall and cut supports for the corners.

The back corner is 2 pieces glued together - didn't have enough for all solid pieces, so I added more scraps between the corner supports for added security. Haven't attached anything yet - just using gravity and keeping my eye on it for now. So far, it's working well enough I might leave it as is.
- hope you're doing well and hope that maybe I sparked a bit of creativity or courage in you!
If you're someone who likes to read, on with the yammer. . . .
Ok, first; honesty - this isn't a 100% free project. Hubs had to make a trip to Home Depot to pick up supplies for a hose rack he's making for the fire department he volunteers for and picked up the faceplate for the cable (it's on the right side of the middle shelf in the pic) to cover up the hole that's been there since we moved.
I'm blogging about this because I'd like to help anyone out there who thinks that craft spaces have to be perfect. Someone who may think that craft rooms can/should be completed with one quick shopping trip. Someone who doesn't realize that craft spaces can take a lot of time (and honestly, can/will/should change in time when your interests change). Someone who needs "permission" to not judge themselves too harshly when comparing themselves and their craft space to another. (Someone like I was. . .ok, like I am - but I am trying not to be. It's a process!) No "true" crafter worthy of her glue gun or score board would judge another, so I need to stop doing it to myself (hopefully are you aren't either).
I believe crafting is making do with what you have and I kinda like the challenge that brings. I am in the process of trying make sense of my space and make things more efficient. I'm trying to make things look better if/when I can - I'm also hoping it'll get me moving and help spark both creativity and confidence in myself. I'm blogging because it might do the same for someone else.
During this time of quarantine, I thought I'd tackle the one area in my craft corner that's been a bit of an issue since I was given permission to use the area. Ironically, it's the actual corner. I've moved more things in and out of it for around 2 years now that I've lost count - and yet all I really saw was the space I wasn't able to use. Hubs is handy, so he told me to design something and said he'd build it. . . I did, but he's gotten a "few" other projects put onto his list (I've still got that "Queen of Understatement" crown) and the craft corner has moved down the line far enough that a completion date is - um, idk, the 53rd of never. (Yes, I know the saying is the 12th of never, but we have a house. kids, and he's working on projects for other people, so there'd have to have more days of the month to come near it) - Anyway, far enough to move on, give up, and finally realize waiting isn't a bright idea. I've decided to try to fix it myself. I have to be able to do something myself that'll work "in the meantime" and might even work for a permanent basis.
After trying a few things either actually in the space or just in my head, I was thinking I could use some of hubs' tools to modify the locker I already had there. I'd cut the top off so I could put wheels on it and cut one side down a bit so it'd fit. There's space beside the white bookcase I have, so I could have shelves that are hidden when the piece is in place. I'd then add a front side, add a handle, and put the wheels on the bottom to have a pull out. Finally had hubs in a decent enough mood to talk to him about it and bounce off a few ideas to see if I could do it and was told it wouldn't work. His tools can't cut off a side of the locker.
On to Plan 75 or whatever it is (I haven't counted them for fear of pissing on my own parade and giving up). So, move on ahead and build the shelves in the recessed area myself and tackle the pull out later. First step, "shop at home" / see what I have to help motivate me into action. It helped that I felt like I'd have nothing to lose and not doing anything would be a bigger mistake than not doing anything.
I found some "extra" wood and measured them to see if they can be shelves. Not perfect, but I can make do - and bonus! They're already white. I also have shelf supports in the form of wooden slats from an IKEA bed I noticed by a parking lot dumpster as we went out for lunch a month or two before TP became more valuable than gold. (The headboard grabbed my eye and I could see a sign project in my future. We had driven our pick-up and the boys had plenty of extra energy when we were leaving, so it seemed perfect to have them grab all of the wood. I figured I could use the rest of the wood for shelf supports for a closet project I was already planning.) Double check with hubs to be sure I'm not stealing from any other projects and full speed ahead.
When all the boys are distracted (including the hubs), clear off things from locker to remove it from the corner and clear the area. Huff & puff as it's slowly lifted from it's awkward spot using my legs to help balance it so I can get a better grip on it and so it doesn't gouge the wall or knock over things in the bookcase as I put it onto the top of the other lockers and then out of the room. Not a brilliant idea, but still did it because - a.) I want it done now while I still am motivated to get things done, b.) I don't want to ask hubs for help because he's pretty busy and will give me grief if/when he actually will come and help, and c.) I'm too lazy and don't want the hassle to take all the stuff out of the bookcase, find places to put it all (don't see enough in my area so it'll be spread out, possibly inconvenience someone else enough for a fit/fight - or it's all put too far and I end up "losing" things), only to move the bookcase to get to the locker and then move everything back to where it just was. ("Ain't nobody got time for that," even in a quarantine.)
Enjoy looking at empty corner because I did it - without any help. Try to enjoy the progress made, try to nurture the tiny confidence gained to help keep things moving forward, and plan the next steps carefully.
Get the stud finder and discover that there's only one support in the planned area. . . plus, wiring along the wall and the idea of drilling into it makes me very nervous. So, modify plan whatever-number to whatever-number-B. Make shelves, but have them sit on supports and eliminate need to drill into wall! Again, check supplies and see what can be used, but try to be more creative this time. Shelf pieces need to match up to the bookcase for the pull out idea and are just a little too long for the depth. Plan on using power tools to trim them down. Other parts from the IKEA dumpster bed placed in the corners should be able to hold up whatever boxes or binders put there when placed (and to think, I almost tossed them). Calculate and realize some pieces need to be glued together because things aren't perfect and there isn't enough to only have one piece supports for every corner. Remeasure things since plans changed. Measure twice, cut once is a good philosophy (especially for people like me who have hard times drawing straight lines, even with a ruler) plus, stuff isn't set up now. Also, this'll take up a few more minutes so, what else are ya gonna do during a quarantine - especially when everyone else is in bed?
Get hubs to get miter saw out so you can trim down the long top, shelves and cut shelf supports. Paint supports white to match all other pieces in area. Put the four bottom supports down and put the bottom shelf on top. Hold breath and see if it stays up. Yes! Breathe again and quickly revel in the joyous feelings of success because we need to celebrate the little things in life, (especially these days!) and keep moving on. Cut two small shelves found at mom's house because - why not have extra insurance? You're not anchoring them to the wall, a few supports are more than one piece, we can all use a little extra support, and you can't think of anything else they'd be used for anyway. Paint em'? Nah, keep the pale lavender (from '86?) to add a little bit of nostalgia when you grab for something off the shelf that will eventually be behind a pull out.
Move on to the top piece and cut with miter saw. Cut as much as you can, then flip piece over and put blade into original cut to line it up and then start blade and cut again because saw isn't designed to cut that long a piece. . . (thank son for holding other side of the piece because you're cutting it to be 73" long and your set up doesn't support the other side of the plank.) Place piece on top of the three lockers and the previously empty space to make a great place for your ScrapRack. (Hope that being nestled in the corner and behind the bookcase will help shield/protect it a bit from sunlight.) Add the IKEA support pieces on the four corners underneath and add the extra pieces.
Stand back and revel in something you did. Try not to visualize what sons would call a meme, but you've always called a "clip" from a TV show.
Do not do it. But I can't help it - NO - it makes a good ending - Not that stereotypical 80's schtick - great one liner before the still shot and end credits roll - It's soooo cheesy - but you know you really wanna say it out loud when the corner is finally finished - - urgh - "I love it when a plan comes together. . . ."
If you're a "pinner," please check me out at https://www.pinterest.com/daylightdesigns/


Comments
Post a Comment